| Pytorch框架PyG库实现基于Cora数据集的GCN节点分类任务 | 您所在的位置:网站首页 › pytorch adam的weight › Pytorch框架PyG库实现基于Cora数据集的GCN节点分类任务 |
Pytorch框架PyG库实现基于Cora数据集的GCN节点分类任务
|
# 导入相关库
import typing
import torch
import torch.nn as nn
import torch.nn.functional as F
import torch_geometric.nn
from torch_geometric.data import Data, DataLoader
from torch_geometric.datasets import Planetoid
from torch_geometric.nn import GCNConv# 选择设备为GPU
device = torch.device('cuda' if torch.cuda.is_available() else 'cpu')
print(f"device : {device}")
# 从PyG库加载Cora数据集
from torch_geometric.datasets import Planetoid
dataset = Planetoid(root='./data/Cora', name='Cora')
graph = dataset[0].to(device) device : cuda print(graph) # 这个图包含2708个节点,每个点的特征长度为1433,有10556条边 # 其中140个节点用于训练,500个节点用于验证,1000个用于测试 # 一共有7类节点 print(f"train num : {graph.train_mask.sum()}") print(f"val num : {graph.val_mask.sum()}") print(f"test num : {graph.test_mask.sum()}") print(f"num classes : {dataset.num_classes}")Data(x=[2708, 1433], edge_index=[2, 10556], y=[2708], train_mask=[2708], val_mask=[2708], test_mask=[2708])train num : 140val num : 500test num : 1000num classes : 7 # 设置输入特征长度为1433 # 设置中间隐藏层特征长度为16 # 设置输出特征长度为7 # 即每个节点的特征从1433变成了7,这7个数值为浮点数,对应了7类节点的概率 # 比如[0.1, 0.1, 0.1, 0.1, 0.1, 0.4, 0.1],那么我们认为这个节点为第6类节点 in_channels = graph.x.shape[1] hidden_channels = 16 # 隐藏层维度 out_channels = dataset.num_classes # 利用PyG库自己写GCN模型 class Net(torch.nn.Module): def __init__(self): super(Net, self).__init__() self.conv1 = GCNConv(in_channels, hidden_channels) self.conv2 = GCNConv(hidden_channels, out_channels) def forward(self, x : Data.x, edge_index : Data.edge_index): # x, edge_index = data.x, data.edge_index x = self.conv1(x, edge_index) x = F.relu(x) x = F.dropout(x, training=self.training) x = self.conv2(x, edge_index) return F.log_softmax(x, dim=1)epochs = 256 # 训练轮数 lr = 0.01 # 学习率 val_record_interval = 8 # 验证频率# 从PyG直接加载GCN模型,懒得自己写 model = torch_geometric.nn.GCN( in_channels=in_channels, hidden_channels=hidden_channels, out_channels=out_channels, num_layers=2, dropout=5e-4, ).to(device) # 或者你也可以选择上面那个自己写的模型作为model # model = Net().to(device) # 选择优化器 optimizer = torch.optim.Adam(model.parameters(), lr = lr, weight_decay=5e-4) # 选择损失函数,这个函数必须搭配LogSoftmax使用,为什么具体自己翻文档 loss_func = nn.NLLLoss() m = nn.LogSoftmax(dim=1)# 记录loss和acc,方便matlibplot作图 loss_x = [e for e in range(epochs)] loss_record = [] acc_x = [e for e in range(epochs) if e%val_record_interval == 0] acc_record = [] for epoch in range(epochs): model.train() optimizer.zero_grad() # 输入shape[2708, 1433],输出shape[2708, 7] out = model(graph.x, graph.edge_index) # print(out.shape) loss = loss_func(m(out[graph.train_mask]), graph.y[graph.train_mask]) loss_record.append(loss.item()) loss.backward() optimizer.step() if epoch % val_record_interval == 0: model.eval() _, pred = model(graph.x, graph.edge_index).max(dim=1) correct = float(pred[graph.val_mask].eq(graph.y[graph.val_mask]).sum().item()) acc = correct / graph.val_mask.sum().item() acc_record.append(acc)# 作图 import matplotlib.pyplot as plt plt.subplot(1, 2, 1) plt.plot(loss_x, loss_record) plt.title('Loss') plt.xlabel('epoch') plt.ylabel('loss') plt.subplot(1, 2, 2) plt.plot(acc_x, acc_record) plt.title('Acc') plt.xlabel('epoch') plt.ylabel('acc') plt.show()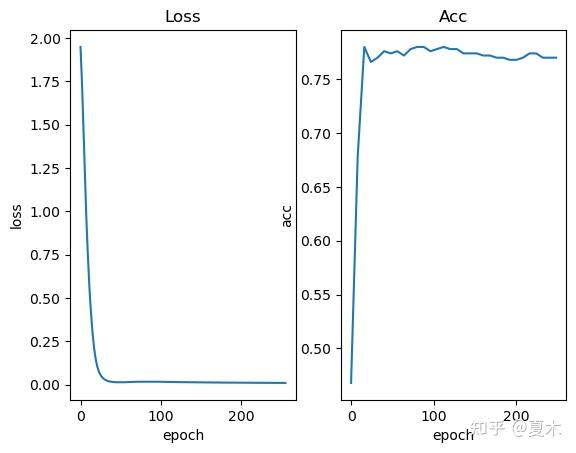 # 最后用test结点测试模型准确率
model.eval()
_, pred = model(graph.x, graph.edge_index).max(dim=1)
correct = float(pred[graph.test_mask].eq(graph.y[graph.test_mask]).sum().item())
acc = correct / graph.test_mask.sum().item()
# print(graph.test_mask.sum().item())
print(f"acc : {acc}") # 最后用test结点测试模型准确率
model.eval()
_, pred = model(graph.x, graph.edge_index).max(dim=1)
correct = float(pred[graph.test_mask].eq(graph.y[graph.test_mask]).sum().item())
acc = correct / graph.test_mask.sum().item()
# print(graph.test_mask.sum().item())
print(f"acc : {acc}")acc : 0.815 |
【本文地址】
公司简介
联系我们